Laravelに入門したい!(Laravel APIサーバー+React SPA)vol.2
前回:Laravelに入門したい!(Laravel APIサーバー+React SPA)vol.1
今回は、ログイン/ログアウト/ユーザーデータ取得/メールベリファイ/パスワード忘れを確認してみる。
ログイン
前回同様、テスト用のコンポーネントを作っていく
import { Box, Button, Stack, TextField } from "@mui/material";
import axios from "axios";
import React from "react";

export default function TestLogin(): JSX.Element {
    const handleLogin = React.useCallback((e: React.FormEvent<HTMLFormElement>) => {
        e.preventDefault()
        const formData = new FormData(e.currentTarget)
        axios.post("/login", {
            "email": formData.get("email"),
            "password": formData.get("password"),
        }, {
            withCredentials: true
        }).then(res => {
            console.log(res.data)
        }).catch(e => {
            console.error(e)
        })
    }, [])
    return (
        <Box
            p={2}
        >
            <Box
                component={"form"}
                p={3}
                onSubmit={handleLogin}
            >
                <Stack
                    spacing={2}
                >
                    <TextField
                        label="email"
                        name="email"
                        type="email"
                        size='small'
                        required
                    />
                    <TextField
                        label="password"
                        name="password"
                        type='password'
                        size='small'
                        required
                    />
                    <Button
                        variant='outlined'
                        fullWidth
                        type='submit'
                    >Login!</Button>
                </Stack>
            </Box>
        </Box>
    )
}
ログインするだけ!結果はコンソールに表示。
ログアウト
import { Box, Button } from "@mui/material";
import axios from "axios";
import React from "react";

export default function TestLogout(): JSX.Element {
    const handleLogout = React.useCallback((e: React.MouseEvent<HTMLButtonElement>) => {
        e.preventDefault()
        axios.post("http://localhost:8000/logout", undefined, {
            withCredentials: true
        }).then(res => {
            console.log(res.data)
        }).catch(e => {
            console.error(e)
        })
    }, [])
    return (
        <Box
            p={3}
        >
            <Button
                variant='outlined'
                fullWidth
                onClick={handleLogout}
            >Logout!</Button>
        </Box>
    )
}
こちらもログアウトするだけ。結果はコンソールに表示。
ユーザーデータ取得
import { Box, Button, Paper, Typography } from "@mui/material";
import axios from "axios";
import React from "react";

interface UserData {
    id: number
    name: string
    email: string
    created_at: string
    updated_at: string
    email_vefified_at: string
}

export default function TestUser(): JSX.Element {
    const [userdata, setUserdata] = React.useState<UserData>()
    const handleUser = React.useCallback((e: React.MouseEvent<HTMLButtonElement>) => {
        e.preventDefault()
        axios.get("http://localhost:8000/api/user", {
            withCredentials: true
        }).then(res => {
            console.log(res.data)
            setUserdata(res.data)
        }).catch(e => {
            console.error(e)
            setUserdata(undefined)
        })
    }, [])
    return (
        <Box
            p={3}
        >
            <Button
                variant='outlined'
                fullWidth
                onClick={handleUser}
            >User!</Button>
            <Paper
                variant="outlined"
                sx={{
                    mt: 2
                }}
            >
            {userdata ? (
                <Box
                    p={2}
                    textAlign={"left"}
                >
                    <Typography>id: {userdata?.id}</Typography>
                    <Typography>name: {userdata?.name}</Typography>
                    <Typography>email: {userdata?.email}</Typography>
                    <Typography>created_at: {userdata?.created_at}</Typography>
                    <Typography>updated_at: {userdata?.updated_at}</Typography>
                    <Typography>email_vefified_at: {userdata?.email_vefified_at}</Typography>
                </Box>
            ) : (
                <Box
                    p={2}
                    textAlign={"left"}
                >
                    <Typography>not login</Typography>
                </Box>
            )}
            </Paper>
        </Box>
    )
}
ユーザーデータを取得して表示する。
メールベリファイ
import { Box, Button } from "@mui/material";
import axios from "axios";
import React from "react";

export default function TestEmailVerificationNotification(): JSX.Element {
    const handleEmailVerificationNotification = React.useCallback((e: React.MouseEvent<HTMLButtonElement>) => {
        e.preventDefault()
        axios.post("http://localhost:8000/email/verification-notification", undefined, {
            withCredentials: true
        }).then(res => {
            console.log(res.data)
        }).catch(e => {
            console.error(e)
        })
    }, [])
    return (
        <Box
            p={2}
        >
            <Button
                variant='outlined'
                fullWidth
                onClick={handleEmailVerificationNotification}
            >EmailVerificationNotification!</Button>
        </Box>
    )
}
メールベリファイ通知を送るだけ。結果はコンソールに表示。
パスワード忘れ・リセット
import { Box, Button, Stack, TextField } from "@mui/material";
import axios from "axios";
import React from "react";

export default function TestForgotPassword(): JSX.Element {
    const handleForgotPassword = React.useCallback((e: React.FormEvent<HTMLFormElement>) => {
        e.preventDefault()
        const formData = new FormData(e.currentTarget)
        axios.post("http://localhost:8000/forgot-password", {
            "email" : formData.get("email")
        }, {
            withCredentials: true
        }).then(res => {
            console.log(res.data)
        }).catch(e => {
            console.error(e)
        })
    }, [])
    return (
        <Box
            component={"form"}
            p={3}
            onSubmit={handleForgotPassword}
        >
            <Stack
                spacing={2}
            >
                <TextField
                    label="email"
                    name="email"
                    type="email"
                    size='small'
                    required
                />
                <Button
                    variant='outlined'
                    fullWidth
                    type='submit'
                >ForgotPassword!</Button>
            </Stack>
        </Box>
    )
}
パスワードを忘れたよーを送信するだけ。結果はコンソールに表示。
バックエンドからメールが送信される。
import { Box, Button, Stack, TextField } from "@mui/material";
import React from "react";
import axios from "axios";

export default function TestResetPassword(): JSX.Element {
    const handleResetPassword = React.useCallback((e: React.FormEvent<HTMLFormElement>) => {
        e.preventDefault()
        const formData = new FormData(e.currentTarget)
        axios.post("http://localhost:8000/reset-password", {
            token: formData.get("token"),
            email: formData.get("email"),
            password: formData.get("password"),
            password_confirmation: formData.get("password_confirmation"),
        }, {
            withCredentials: true
        }).then(res => {
            console.log(res.data)
        }).catch(e => {
            console.error(e)
        })
    }, [])
    return (
        <Box
            component={"form"}
            p={3}
            onSubmit={handleResetPassword}
        >
            <Stack
                spacing={2}
            >
                <TextField
                    label="token"
                    name="token"
                    type="text"
                    size='small'
                    required
                />
                <TextField
                    label="email"
                    name="email"
                    type="email"
                    size='small'
                    required
                />
                <TextField
                    label="password"
                    name="password"
                    type="password"
                    size='small'
                    required
                />
                <TextField
                    label="pasword(confirm)"
                    name="password_confirmation"
                    type='password'
                    size='small'
                    required
                />
                <Button
                    variant='outlined'
                    fullWidth
                    type='submit'
                >ResetPassword!</Button>
            </Stack>
        </Box>
    )
}
パスワード忘れたよーのメールに記載されたtokenを使って、パスワードをリセットする。結果はコンソールに表示。
各コンポーネントを表示
import { Paper, Stack } from '@mui/material';
import './App.css';
import TestCSRF from './test/TestCSRF';
import TestCreateUser from './test/TestCreateUser';
import TestEmailVerificationNotification from './test/TestEmailVerificationNotification';
import TestForgotPassword from './test/TestForgotPassword';
import TestLogin from './test/TestLogin';
import TestLogout from './test/TestLogout';
import TestResetPassword from './test/TestResetPassword';
import TestUser from './test/TestUser';

function App() {
    return (
        <div className="App">
            <Stack
                spacing={3}
                p={3}
                mx={"auto"}
                maxWidth={"sm"}
            >
                <Paper
                    variant='outlined'
                >
                    <TestCSRF />
                </Paper>
                <Paper
                    variant='outlined'
                >
                    <TestCreateUser />
                </Paper>
                <Paper
                    variant='outlined'
                >
                    <TestLogin />
                </Paper>
                <Paper
                    variant='outlined'
                >
                    <TestLogout />
                </Paper>
                <Paper
                    variant='outlined'
                >
                    <TestUser />
                </Paper>
                <Paper
                    variant='outlined'
                >
                    <TestEmailVerificationNotification />
                </Paper>
                <Paper
                    variant='outlined'
                >
                    <TestForgotPassword />
                </Paper>
                <Paper
                    variant='outlined'
                >
                    <TestResetPassword />
                </Paper>
            </Stack>
        </div>
    );
}

export default App;
表示してみる
表示するとこんな感じ
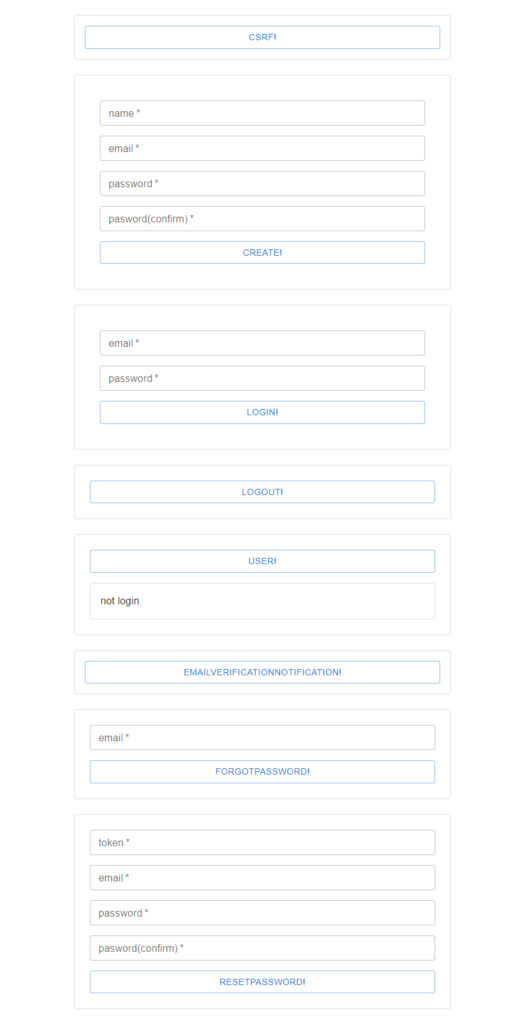
もうちょっと見やすく作ればよかったと思う後悔はおいといて、これで、デフォルトで追加されているルートはだいたい利用できる。
残ったルートは、
GET|HEAD /
POST _ignition/execute-solution
GET|HEAD _ignition/health-check
POST _ignition/update-config
GET|HEAD verify-email/{id}/{hash}
くらい。
「/」はバージョンを表示させるだけのルート
「_ignition/・・・」はデバッグ用のルート
「verify-email/{id}/{hash}」はメールベリファイ用のルート(メールに載るURL)
動作を確認してみる
長々と確認したことを書いてみる。
まずは、ログインしているかしていないのかよくわからない状態なので、「USER!」ボタンを押してみる
「not login」のままの場合と、ユーザーデータが表示される場合がある。
これは、ユーザーを作成したあとすぐに「USER!」ボタンを押すと、ユーザーデータが表示される模様。
おそらくユーザー作成時、自動的にログインする仕様になっているということであろう。
ログインできていない場合は、emailとpasswordを入力して、「LOGIN!」を押してみる。
そのあと、「USER!」ボタンを押すと、ユーザーデータが表示される。
あれ、、、?CSRFトークンは?と思ったけど、ログインできていなくても、「/api/user」にアクセスしたときに、CSRFトークンがセットされている模様。
試しに、バージョンを取得する「/」にアクセスしてみた場合もCSRFトークンがセットされていたので、
単純にGETの場合は、CSRFトークンがセットされるのかな?
とにかく、ログインできたので、そのままログアウトを試す。
「LOGOUT!」ボタンからの「USER!」ボタンで、「not login」が表示される。
「EmailVerificationNotification!」ボタンはログインが必要なので、ログインしてから、「EmailVerificationNotification!」ボタンを押す。
すると、backendがメールを送信する。メールの確認はMailDevを使う。docker-compose.ymlをLaravelに入門したい!(Laravel APIサーバー+React SPA)vol.1で設定したものと同じにしてあれば、http://localhost:1080/ で確認ができる。
メールのVerify Email Addressをクリックすると、メール確認ができる。
メールベリファイが完了したら、ユーザーデータを取得したとき「email_verified_at」にメールベリファイ完了日時が入る。
パスワード忘れによるパスワードリセットは、ログアウトしている状態である必要があるので、いったんログアウトする。
そのあと、emailを入力して、「FORGOT PASSWORD!」をクリックすると、メールが送信される。(ログインしている場合は、/dashboardにリダイレクト、メールアドレスが見つからないときは、「422」エラー)
本当は、メールのリンクをクリックするとtokenをSPA内で取得するようにすべきだけど、今回は、そんなことしていないので、メールに記載されているURL「http://localhost:3000/password-reset/〇〇?email=△△」の〇〇の部分がtokenなので、そこをコピペして、token、email、password、password(confirm)を入力して、「RESETPASSWORD!」をクリック。
新しいパスワードでログインができるか確認してみる。
ここまでやってみて、、、
パスワードリセットが最初から使えるのはありがたい!
でも、メールアドレスが見つからないとき「422」返す仕様とか、やたら、dashboardにリダイレクトしたがる仕様とか、(あたりまえだけど)実際に使うにはいろいろとカスタマイズしないといけないなと。
あと、個人的には、正常完了時、dataに何も入っていないので、{status: “ok”}くらいは返しときたいと思ったりする。
次回は、ここから仕様を変更していこうかな。
Laravelに入門したい!(Laravel APIサーバー+React SPA)vol.1
やっぱ、PHPはLaravelなのか!?
フルスタックのフレームワークはあまり乗り気ではないけれど、
そんなことを思ってしまう今日この頃。。。
今回はLaravelに入門してみたい。
とりあえず、LaravelでAPIサーバーを作ってReactでSPA作って、パスワード認証する感じのものを作っていこうと思う。
まずは、ユーザー登録機能まで。
環境
・PHP:8.1
・Laravel:10.x
・データベース:mysql8
とりあえずLaravel
まずはLaravelのプロジェクトを新規作成
場所は「/backend」にする。
$ composer create-project laravel/laravel backend
この状態からでもいろいろできそうだけど、今回は、Laravelをバックエンドのみで使いたい。
ということで、スターターキットを使ってみる。
$ cd backend
/backend $ composer require laravel/breeze --dev
/backend $ php artisan breeze:install api
ないものが追加されていく感じなのかなと思っていたら、いろいろと不必要なものも削除してくれているじゃないか。
ありがたい話です。
データベース準備
docker composeで準備してみる。
データベースサーバーはmysql8
ついでに、phpmyadminとmaildevも入れておく。
ファイルを作成「/docker-compose.yml」
volumes:
  local-dev-db:

services:

  app_db:
    image: mysql:8
    environment:
      MYSQL_ROOT_PASSWORD: ${MYSQL_ROOT_PASSWORD:-rootpassword}
      MYSQL_DATABASE: ${DATABASE_NAME:-app_db}
      MYSQL_USER: ${DATABASE_USER:-app_db}
      MYSQL_PASSWORD: ${DATABASE_USER_PASSWORD:-password}
      TZ: "Asia/Tokyo"
    ports:
      - "3306:3306"
    volumes:
      - local-dev-db:/var/lib/mysql


  phpmyadmin:
    image: phpmyadmin
    environment:
      PMA_ARBITRARY: 1
      PMA_HOST: app_db
      PMA_USER: root
      PMA_PASSWORD: ${MYSQL_ROOT_PASSWORD:-rootpassword}
      MEMORY_LIMIT: 512M
      UPLOAD_LIMIT: 512M
    ports:
      - "8080:80"

  maildev:
    image: maildev/maildev
    ports:
      - "1080:1080"
      - "1025:1025"
必要であれば、「/.env」を作成
MYSQL_ROOT_PASSWORD=password_for_mysql_root_user
DATABASE_NAME=application_database_name
DATABASE_USER=application_database_user
DATABASE_USER_PASSWORD=password_for_application_database_user
dockerを立ち上げる
/ $ docker compose up -d
laravelのデータベースとメールサーバーの設定をdocker環境に合わせる
....

DB_CONNECTION=mysql
DB_HOST=127.0.0.1
DB_PORT=3306
DB_DATABASE=application_database_user_laravel_api
DB_USERNAME=application_database_user
DB_PASSWORD=password_for_application_database_user

....

MAIL_MAILER=smtp
MAIL_HOST=127.0.0.1
MAIL_PORT=1025
MAIL_USERNAME=null
MAIL_PASSWORD=null
MAIL_ENCRYPTION=null
MAIL_FROM_ADDRESS="hello@example.com"
MAIL_FROM_NAME="${APP_NAME}"

...
いったんデータベースのマイグレーションをしておく。
/backend $ php artisan migrate
バックエンド側はいったん終了
SPA側を準備
Create Reactで作成しておく。ついでにmuiとaxiosを入れておく。
(fetchだとうまく動作しなかった。。。多分設定不十分なのだけど、まだちゃんと調査していない。)
階層は「/frontend」
/ $ npx create-react-app frontend --template typescript
/ $ cd frontend
/frontend $ npm i @mui/material @emotion/react @emotion/styled @mui/icons-material axios
次は、動作確認用のフォームを作っていく。
ユーザー登録用フォーム
/frontend/spa/src/test/TestCreateUser.tsx を作成
import { Box, Button, Stack, TextField } from "@mui/material";
import React from "react";
import axios from "axios";

export default function TestCreateUser(): JSX.Element {
    const handleCreate = React.useCallback((e: React.FormEvent<HTMLFormElement>) => {
        e.preventDefault()
        const formData = new FormData(e.currentTarget)
        axios.post("http://localhost:8000/register", {
            "name": formData.get("name"),
            "email": formData.get("email"),
            "password": formData.get("password"),
            "password_confirmation": formData.get("password_confirmation")
        }, {
            withCredentials: true
        }).then(res => {
            console.log(res.data)
        }).catch(e => {
            console.error(e)
        })
    }, [])
    return (
        <Box
            p={2}
        >
            <Box
                component={"form"}
                p={3}
                onSubmit={handleCreate}
            >
                <Stack
                    spacing={2}
                >
                    <TextField
                        label="name"
                        name="name"
                        size='small'
                        required
                    />
                    <TextField
                        label="email"
                        name="email"
                        type="email"
                        size='small'
                        required
                    />
                    <TextField
                        label="password"
                        name="password"
                        type='password'
                        size='small'
                        required
                    />
                    <TextField
                        label="pasword(confirm)"
                        name="password_confirmation"
                        type='password'
                        size='small'
                        required
                    />
                    <Button
                        variant='outlined'
                        fullWidth
                        type='submit'
                    >Create!</Button>
                </Stack>
            </Box>
        </Box>
    )
}
これだけだと、419エラーが出るので、あらかじめcsrf-cookieを取得できるようにする。
(動作の確認がメインなので、今回は手動でとれるようにする。普通はこんなことしないけどね)
/frontend/spa/src/test/TestCSRF.tsx を作成
import { Box, Button } from "@mui/material";
import React from "react";
import axios from "axios";

export default function TestCSRF(): JSX.Element {
    const handleCSRF = React.useCallback((e: React.MouseEvent<HTMLButtonElement>) => {
        e.preventDefault()
        axios.get("http://localhost:8000/sanctum/csrf-cookie", {
            withCredentials: true
        }).then(res => {
            console.log(res.data)
        }).catch(e => {
            console.error(e)
        })
    }, [])
    return (
        <Box
            p={2}
        >
            <Button
                variant='outlined'
                fullWidth
                onClick={handleCSRF}
            >CSRF!</Button>
        </Box>
    )
}
frontend/spa/src/App.tsx を書き換える
import { Paper, Stack } from '@mui/material';
import './App.css';
import TestCSRF from './test/TestCSRF';
import TestCreateUser from './test/TestCreateUser';

function App() {
    return (
        <div className="App">
            <Stack
                spacing={3}
                p={3}
                mx={"auto"}
                maxWidth={"sm"}
            >
                <Paper
                    variant='outlined'
                >
                    <TestCSRF />
                </Paper>
                <Paper
                    variant='outlined'
                >
                    <TestCreateUser />
                </Paper>
            </Stack>
        </div>
    );
}

export default App;
動作を確認してみる
バックエンドとフロントエンドを起動する
/ $ cd backend
/backend $ php artisan serve

/ $ cd frontend
/frontend $ npm run start
画面はこんな感じ
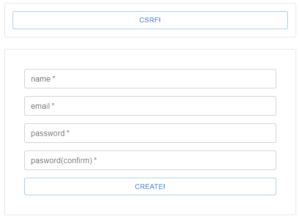
試しに「name」「email」「password」「pasword(confirm)」を入力して、「Create!」ボタンをクリックすると、
「419」エラーが返ってくる。レスポンスのエラーメッセージを見てみると、「CSRF token mismatch.」と書いてある。(ブラウザのデベロッパーツールから確認)
次に上の、「CSRF!」ボタンをクリックして、「Create!」ボタンをクリックすると、
「204 No Content」が返ってくる。(ブラウザのデベロッパーツールから確認)
dockerで用意しておいた、phpmyadmin(http://localhost:8080)からデータベースを確認してみると、
usersテーブルにデータが追加されている。
ここまでやってみて、、、
自分で作ると何かと面倒なユーザー登録機能。Laravelで作ると結構簡単にできるんだな。
あとは、ログインやパスワードリセットも用意されているようなので、そちらも確認していく!
そのあと、細かい動作を確認して、カスタマイズを確認して、、、やることはまだたくさん。。。